Showing posts with label diy. Show all posts

Happy National Margarita Day!!!

That's right this Saturday, February 22 is National Margarita Day. it's really a day. And guess what y'all? My favorite adult beverage is a well made Cadillac Margarita on the rocks.
In order to celebrate I thought it might be fun to make two types of margaritas. The first will be a Jalapeno Margarita and the other a Lavender. I've never done this before so I won't post a recipe yet since I'll be making it up as I go. Now if I'm successful, I'll post the recipe here on the blog. Hmmm... what the heck, I'll post it regardless then that way you'll know what not to do.

Have a great weekend! xo 

Valentine's Week : Beauty


Hi everyone, Valentine's Day is tomorrow. Are you ready? When I was younger one of my favorite things to do was to play dress up. Now that I've grown-up, "playing dress up" is just as fun and Valentine's is the perfect occasion to "play." You get a chance to treat yourself and the special person in your life by simply looking your best!
Below I've put together an easy Valentine's Day look using the ever popular Naked Palette (version #1) by Urban Decay.... 
Whether you're going out with that special person or getting together with the girls, this look is perfect for a night out on the town. 
So without further ado, let's play....
 
Step 1: As always start with a clean face...wash and moisturize. Prime your face as a base in preparation for your makeup.  Here I'm using Clinique's Superprimer and Color Corrector for Deeper Skin tones.  Clinique is my go to skin care source because their products are non-comedogenic and non-acnegenic which for makeup junkies like me simply means it won't make your skin worse!


Step 2: Prime your eyelids up to the eyebrow to make sure your eyeshadows are both vibrant and long lasting.  I am using Soft Ochre prolong wear paintpot by MAC Cosmetics.
YouTube is a great source for eyebrow tutorials if you need one.  Just type in "eyebrow tutorial" and you will open a window to hours of videos!

Step 3: Fill in your eyebrows because they frame your face. (There is more than 1 way to put on your makeup...some people do their foundation & then their shadow& then brows...do whatever is most comfortable for you.)


 Step 4: Start by dipping your MAC 239 brush (or equivalent) in the color Virgin and applying to your brow bone as a highlight.

Step 5: Using a MAC 224 brush (or equivalent) dip into the color Buck and blend into your corner crease using a windshield wiper motion. Then with the same brush dip into the color Darkhorse and blend into your corner crease in a v-shape.

Step 6: Use your MAC 239, dip it back into Virgin and place on your lid. Look in the mirror and if the colors aren't vibrant enough just use the same brushes and add more. Clean up any fall out with a wipe. I love using MAC's makeup remover wipes or Neutrogena wipes to clean up the fall out from under my eyes.

Step 7: Add eyeliner (I used ELF's eyeliner pen in black) and false lashes (I used MAC 34s.)

Step 8: Put on your foundation and blend with a beauty blender sponge. I'm using Kevyn Aucoin's Sensual Skin Enhancer SX12 & Laura Mercier's Oil Free Tinted Moisturizer.

Step 9: Contour and highlight to give definition to your face. I'm using  MAC blush in Clove & Extra Dimension Skinfinish in Shape the Future (limited edition.)

Step 10: Add blush to the apple of your cheeks. Set the look with Makeup Forever HD pressed powder. The for added, I spray on NYX's Matte Finish setting spray.

Step 11: Add a vibrant red lip. Here I'm using MAC's chromographic liner in Basic Red and MAC's popular matte red, Russian Red. Done!

Go ahead, admire your handy work in the mirror and then go have some fun! Hope your Valentine's is as fabulous as you look. 


Tiffany Nelson is an LA Based makeup artist specializing in special occasion makeup and makeup for the "everyday woman on the go."  You can follow her on Instagram @TNEL_MUA.

Valentine's Week :: Sweet Pamphlet Notebooks

This Friday is Valentine's day! Are you excited for it? For the most part it's just another day however, it's fun planning ways to encourage other people. We can get so busy in life and Valentine's is a great opportunity to let others know that we think of them and that they are loved. So with that this weeks posts will be dedicated to Valentine's. I'll be sharing a few ideas for decorating, gift giving, and a special makeup tutorial from an amazing makeup artist.
First up this week are these sweet little pamphlet notebooks that are not only cute, but super easy to make:
Pamphlet Notebooks
---------------------------------------------------------------------------------------------------
---------------------------------------------------------------------------------------------------
Supplies: (4) sheets of text paper 5 1/2in x 8in, (1)decorative paper 5 1/2in x 8in, needle, thread, awl, and scissors

  1. Trim your text & decorative papers down to 5 1/2in x 8in using a paper trimmer or with a ruler, x-acto knife, and cutting mat. you can trim the decorative paper slighter longer than 8in. and trim it down after you finish the book.
  2. Fold your 4 sheets of text paper in half and smooth out the spine with a bone folder. Repeat process with your decorative paper.
  3. Use an awl to punch a hole into the center of the signature (the 4 sheets of folded paper) and the cover, then punch another hole about an inch from the top and an inch from the bottom.
  4. Insert threaded needle through the center hole, either from the inside or outside of the book leaving a 3” – 4” tail of thread.
  5. Next insert needle into one of the outer holes, then skip the center hole and proceed to the opposite outer hole.
Bring thread back into the center hole and on the opposite side of the longest stitch to create a second tail. Gently pull thread taut and tie off. Cut excess thread as desired and your done.
You could make a few and bundle them together with ribbon or bakers twine. sweet.

notes: for the text paper I used a nice writing paper since I'm giving the notebooks as gifts, not copier paper. The decorative paper is actually Rifle Papers gift wrap that I found at Oh, Hello Friend. It's thinner than I would normally use, but I love how pretty it is
xo, jen

What's the Time?


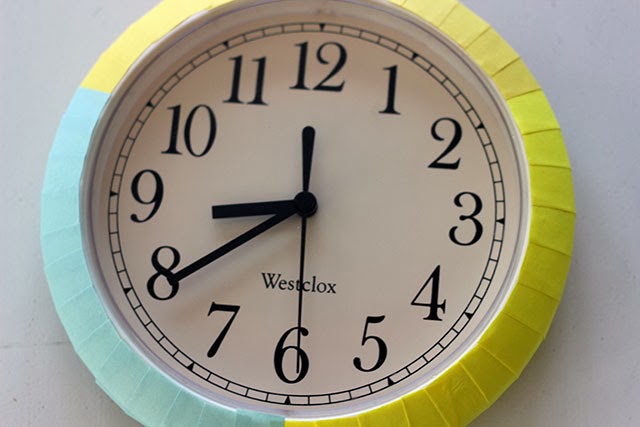
Time for a quick and easy DIY. When we moved into our place, it came with one of those not so cute plastic clocks. Believe it or not, we lived with it for 3 years...dead battery and all. I'm not proud, but it's the truth. For some strange reason after three years, I felt the need to do something about the clock. First thought, ask the landlord if she wanted it back, but she was out of town. Second thought, clean it, and try to jazz it up a bit. So I pulled out my case of washi tape and went to town. Here's the result. It's kinda cute. You too can do this and here's how:

  1. if your clock is old and grimy like this one, clean and dry it first
  2. then decide a color scheme. initially i was going to do an ombre effect with the yellows, but because the kitchen is so outdated, this yellow clock would have dated it even more so I added blue washi tape.
  3. cut small strips of washi tape and line it up to the face and wrap it around the edge to the back
  4. keep repeating step 3 until you've wrapped the whole clock.
  5.  and you're done. hang it up and call it cute!

The tapes I used are from Target. I can't remember the brand, but they are not my faves. Some of the tape wasn't sticking well at first so I  had to make sure to press it down firmly. Maybe a light sanding would help the tape grip a little better?

xo, jen

Oops...Made You Cute!

A while ago I picked up 4 chairs at my local Goodwill store. Plain, inexpensive, and perfect for our outdoor gatherings. The plan was to paint them, but I just never got around to it. So a couple of months ago, while at Home Depot, I came across some fabulous colors of "Oops" paint. Oops paint are containers of paint that were a "mess up" color or maybe someone changed their mind about wanting the paint. Home Depot then sells those containers of paint at a reduced price. The "oops" colors that I liked were the small "try me" containers and were only .50¢ a pop. score. Needless to say I bought all of them and FINALLY got around to painting those chairs.
  • First they were wiped down, lightly sanded, and wiped clean again.
  • Then I painted them with a flat paint brush giving them two coats. Since the paint was flat, the drying time between coats was quick. Although I used a flat paint brush, a foam roller brush probably would've been a better choice.
  •  That's it! I didn't put any type of clear varnish on top, but since the paint is flat I will before the chairs are used again.
They're so cute! Our guests loved them and so do I. Have you painted anything lately?


xo, jen